Most large scale, high traffic applications have some form of analytics bound to it. Within the company that I work at, analytics are a very crucial part of what will build. In this post I will explain how myself and a few others from our team came up with a method to utilize NgRx Effects to listen for DOM interaction to map analytics calls and send to our internal backend analytics api. Lets get started...
Initial Setup
The implementation inside our project at work is a lot more complex than what I will cover in this post so for sake of simplicity, we can begin with a new Angular project.
ng new Analytics then cd Analytics
Now that you have the application created, you will need to add 'store' and 'effects' from NgRx.
ng add @ngrx/store
ng add @ngrx/effects
Next we can start to scaffold out the example project. The following is the tree structure for how the project will look, starting within the app directory. If you prefer, you can create each of the files now or as I explain each one.
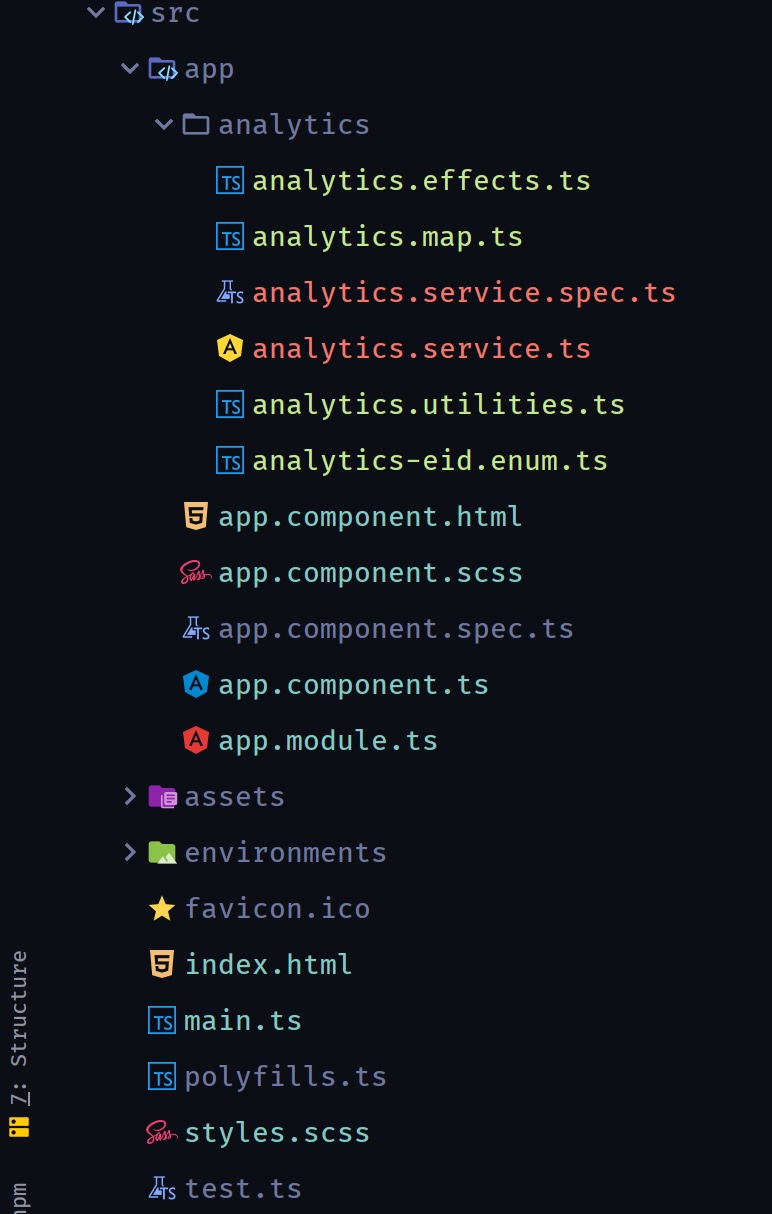
Build out Analytics files
The first file we will focus on is the analytics.effects.ts file. This is where the functionality that catches all the DOM interaction resides and processes the events to make sure analytics calls are made correctly.
A const is declared, before our effects class, that will be used to filter out any DOM events that do not include either data_analytics or a data-analytics attribuite associated with it. These properties and their usage will be explained in more detail later on. For now just know that these are what we attach our analytics to.
// analytics.effects.ts
import { Injectable } from '@angular/core';
import { Effect } from '@ngrx/effects';
import { filter, tap } from 'rxjs/operators';
import { fromEvent, merge } from 'rxjs';
import { AnalyticsData, analyticsValidPayloads } from './analytics.map';
import { AnalyticsService } from './analytics.service';
import { AnalyticsUtilities } from './analytics.utilities';

const isValidAnalyticsTrackCallPayload = event =>
  (event && event.detail && event.detail.data_analytics) ||
  (event && event.target && event.target.hasAttribute && event.target.hasAttribute('data-analytics'));

@Injectable()
export class AnalyticsEffects {
Two variables are declared right inside our AnalyticsEffects class. One triggering on 'click' events within document and the other triggering on a custom event named 'customAnalytics'.
// analytics.effects.ts
@Injectable()
export class AnalyticsEffects {
  click$ = fromEvent(document, 'click');
  customEvent$ = fromEvent(document, 'customAnalytics');
Before getting into the details of the effect, go ahead and jump to the bottom of the AnalyticsEffects class and create the following constuctor.
// analytics.effects.ts
constructor(
    private analyticsService: AnalyticsService,
    private analyticsUtilities: AnalyticsUtilities
  ) {}
Create an effect and set the dispatch to false. Our effect is only listening for events and will not be dispatching any actions. For this example, I have named the effect analyticsTrackCall$ and set it to pipe the merged values of the click$ and customEvents$ Observables, utilizing the isValidAnalyticsTrackCallPayload const we previously created to filter unwanted events.
// analytics.effects.ts
@Effect({ dispatch: false })
  analyticsTrackCall$ = merge(this.click$, this.customEvent$).pipe(
    filter(isValidAnalyticsTrackCallPayload),
Next we use tap and get the event for processing. The analyticsEnum variable will be be assigned a value and checked against mapping via analyticsValidPayloads.get(). Inside the if / else if block we are checking for two different types of analytics events. The first is checking for event.detail.data_analytics which is a CustomEvent that we build to handle sending analytics that may require more data than a simple click event. The second check is for the simple analytics mapped to a DOM element.
// analytics.effects.ts
    tap(event => {
      let analyticsEnum;

      if (event && event.detail && event.detail.data_analytics) {
        analyticsEnum = event.detail.data_analytics;
      } else if (event && event.target) {
        analyticsEnum = event.target.getAttribute('data-analytics');
      }
Once we have checked the event and have a value assigned to our analyticsEnum, we pass it to analyticsValidPayloads.get(analyticsEnum). AnalyticsData and analyticsValidPayloads both come from our analytics.map.ts file. Make sure you have the following import at the top of your analytics.effects.ts file.
import { AnalyticsData, analyticsValidPayloads } from './analytics.map';
By sending the analyticsEnum to analyticsValidPayloads, we can map the item to AnalyticsData type but more importantly, we can process custom requests.
// analytics.effects.ts
      let analyticsEvent: AnalyticsData = analyticsValidPayloads.get(analyticsEnum);

      // If there was no analytics map for EID, create analyticsData object with only EID
      if (analyticsEvent === undefined) {
        analyticsEvent = { eid: analyticsEnum };
      }
Taking a look at the analytics.map.ts file, you can see the interface for AnalyticsData with two properties, eid and data. The neat part is what happens when the analyticsValidPayloads.get(analyticsEnum) call is made from our analytics.effects.ts file and a analyticsValidPayloads .set() parameter matches the passed in enum value. When a match is mapped, we construct a new AnalyticsData object with custom data that will then be used back in the effect. Don't worry if this isn't clear right now. After walking through the code, I will show examples of this working.
// analytics.map.ts
import { AnalyticsEidEnum } from './analytics-eid.enum';

export interface AnalyticsData {
  eid: string;
  data?: {};
}

export const analyticsValidPayloads: Map<string, AnalyticsData> = new Map<string, AnalyticsData>();

analyticsValidPayloads.set(AnalyticsEidEnum.form_close, {
  eid: AnalyticsEidEnum.form_close,
  data: {
    formPristine: 'getFormPristine'
  }
});
Back in the analytics.effects.ts file we do some more checks to determine how to construct the final analytics object. If the event has data_adHoc, we go ahead send that data along with the eid to the AnalyticsService.
Next we check the analyticsEvent that was assigned a value earlier via analyticsValidPayloads.get() for data; If the the analyticsEvent does have data, we take each key, assign it to const analyticsFn which then allows us to index into analyticsUtilities to call the matching function, passing in event as the parameter. Looking back to when we constructed to object above with data: {formPristine: 'getFormPristine'}, analyticsFn would be formPristine, therefore calling the getFormPristine(event) function in AnalyticsUtilities and assigning the the returned value to adHocData. Finally, the eid and [adHocData] are sent to the AnalyticsService.
If neither of the first two checks are satisfied, we pass on the simple eid form of analytics data to AnalyticsService.
// analytics.effects.ts
      if (event.detail.data_adHoc) {
        this.analyticsService.track(analyticsEvent.eid, [event.detail.data_adHoc]);
      } else if (analyticsEvent.data) {
        const adHocData = {};
        Object.keys(analyticsEvent.data).forEach(key => {
          const analyticsFn = analyticsEvent.data[key];
          adHocData[key] = this.analyticsUtilities[analyticsFn](event);
        });
        this.analyticsService.track(analyticsEvent.eid, [adHocData]);
      } else {
        this.analyticsService.track(analyticsEvent.eid);
      }
    })
  );
// analytics.effects.ts
@Effect({ dispatch: false })
analyticsTrackCall$ = merge(this.click$, this.customEvent$).pipe(
filter(isValidAnalyticsTrackCallPayload),
tap(event => {
let analyticsEnum;
if (event && event.detail && event.detail.data_analytics) {
analyticsEnum = event.detail.data_analytics;
} else if (event && event.target) {
analyticsEnum = event.target.getAttribute('data-analytics');
}
let analyticsEvent: AnalyticsData = analyticsValidPayloads.get(analyticsEnum);
// If there was no analytics map for EID, create analyticsData object with only EID
if (analyticsEvent === undefined) {
analyticsEvent = { eid: analyticsEnum };
}
if (event.detail.data_adHoc) {
this.analyticsService.track(analyticsEvent.eid, [event.detail.data_adHoc]);
} else if (analyticsEvent.data) {
const adHocData = {};
Object.keys(analyticsEvent.data).forEach(key => {
const analyticsFn = analyticsEvent.data[key];
adHocData[key] = this.analyticsUtilities[analyticsFn](event);
});
this.analyticsService.track(analyticsEvent.eid, [adHocData]);
} else {
this.analyticsService.track(analyticsEvent.eid);
}
})
);The following is the AnalyticsService. For sake of simplicity, the track() function just logs out the data passed in. For real world implementation you would configure the service to send this data to your analytics api.
// analytics.service.ts
import { Injectable } from '@angular/core';

@Injectable({
  providedIn: 'root'
})
export class AnalyticsService {

  constructor() {
  }

  track(id: string, rawAdHocData?: any) {
    rawAdHocData
      ? console.log(`id: ${id} | adHocData: ${JSON.stringify(rawAdHocData)}`)
      : console.log(`id: ${id}`);
  }
}
The analytics-eid.enum.ts file hold the enums that are the eid for each analytics call.
// analytics-eid.enum.ts
export enum AnalyticsEidEnum {
  form_name = 'analyticsApp_submit_form_nameForm',
  form_close = 'analyticsApp_action_form_close',
  btn_cancel = 'analyticsApp_action_button_genericCancel',
  btn_submit = 'analyticsApp_action_button_genericSubmit'
}
The analytics.utilities.ts file holds the function for creating a new CustomEvent. You may notice the new CustomEvent typeArg is set to 'customAnalytics'. This coordinates with the customEvent$ Observable we decalred at the beginning of the effect. We then dispatch this newly created customEvent to the document which allows it to be picked up in the effect. We will see how this function is used in just a bit.
This file also holds any special functions you want to define. In this example we have the getFormPristine(event) function. I touched on how this function is called a little earlier.
// analytics.utilities.ts
import { DOCUMENT } from '@angular/common';
import { Inject, Injectable } from '@angular/core';

@Injectable({ providedIn: 'root' })
export class AnalyticsUtilities {
  constructor(@Inject(DOCUMENT) private document: Document) {
  }

  public customAnalyticsEvent(analyticsMapId: string, adHocData?): void {
    const customEvent = new CustomEvent('customAnalytics', {
      detail: {
        data_analytics: analyticsMapId,
        data_adHoc: adHocData
      }
    });
    this.document.dispatchEvent(customEvent);
  }

  public getFormPristine(event) {
    return event.target.value;
  }
}
Build out App files
Now that I have covered the files that handle the analytics functionality of the application, we can take a look at the app.component files to see how we can make use of the analytics code.
Inside the app.module.ts file we have EffectsModule.forRoot([AnalyticsEffects]) declared in the imports. This will give application wide access to the AnalyticsEffects.
Walking down the AppComponent, you'll see we have a couple variables and a form. In the constructor we have AnalyticsUtilities. In the onSubmit() function we call handleFormAnalytics(). This function loops over the controls of our form and builds up the adHocData array with each control name and the length of value within each control. Next it calls customAnalyticsEvent inside our AnalyticsUtilities with AnalyticsEidEnum.form_name as the eid and adHocData as our analytics data.
// app.component.ts
import { Component } from '@angular/core';
import { FormControl, FormGroup } from '@angular/forms';
import { AnalyticsEidEnum } from './analytics/analytics-eid.enum';
import { AnalyticsUtilities } from './analytics/analytics.utilities';

@Component({
  selector: 'app-root',
  templateUrl: './app.component.html',
  styleUrls: ['./app.component.scss']
})
export class AppComponent {
  public readonly title = 'analytics';
  public readonly analyticsEidEnum = AnalyticsEidEnum;
  public showForm = true;
  public nameForm: FormGroup = new FormGroup({
    firstName: new FormControl(''),
    lastName: new FormControl(''),
  });

  constructor(private analyticsUtilities: AnalyticsUtilities) {
  }

  onSubmit() {
    this.handleFormAnalytics();
  }

  toggleForm() {
    this.showForm = !this.showForm;
  }

  private handleFormAnalytics() {
    const adHocData = [];
    Object.keys(this.nameForm.controls).forEach(key => {
      adHocData.push({
        controlName: key,
        valueLength: this.nameForm.controls[key].pristine ? 0 : this.nameForm.controls[key].value.length
      });
    });
    this.analyticsUtilities.customAnalyticsEvent(
      AnalyticsEidEnum.form_name,
      adHocData
    );
  }
}
The app.component.html file is below. The first element to observe is the form element. Upon submission of the form, onSubmit() is called which as we saw above calls handleFormAnalytics() with values from the form group. Next we have a button for closing the form. There are two parts on the button that help us with gathering analytics when the form is closed. First [attr.data-analytics]="analyticsEidEnum.form_close" and then [value]="nameForm.pristine". The 'data-analytics' attribute gets picked up in the AnalyticsEffects class and when mapped, .form_close enum is detected and data: {formPristine: 'getFormPristine'} is added. Then when getFormPristine(event) is called, the value provided via [value]="nameForm.pristine" is used. This example will provide analytics showing is a user started to complete the form before closing it. Simple, but just an example.
Last we have two more buttons, Cancel and Submit, that have simple generic analytics attributes:
[attr.data-analytics]="analyticsEidEnum.btn_cancel"
[attr.data-analytics]="analyticsEidEnum.btn_submit"
// app.component.html
<div id="form-container">
  <form *ngIf="showForm" [formGroup]="nameForm" (ngSubmit)="onSubmit()" class="name-form">
  <button class="btn-close" (click)="toggleForm()" [attr.data-analytics]="analyticsEidEnum.form_close" [value]="nameForm.pristine">X</button>

    <mat-form-field class="name-full-width">
      <input formControlName="firstName" matInput placeholder="First Name: " required>
    </mat-form-field>

    <mat-form-field class="name-full-width" >
      <input formControlName="lastName" matInput placeholder="Last Name: " required>
    </mat-form-field>

    <button mat-raised-button [attr.data-analytics]="analyticsEidEnum.btn_cancel" type="button">Cancel</button>
    <button mat-raised-button color="primary" [attr.data-analytics]="analyticsEidEnum.btn_submit" type="submit">Submit</button>
  </form>
  <button mat-raised-button color="primary" class="btn-open" *ngIf="!showForm" (click)="toggleForm()">Open Form</button>
</div>
Try it all out
Now lets take a look at these calls in action!
Here is the simple form for this example:
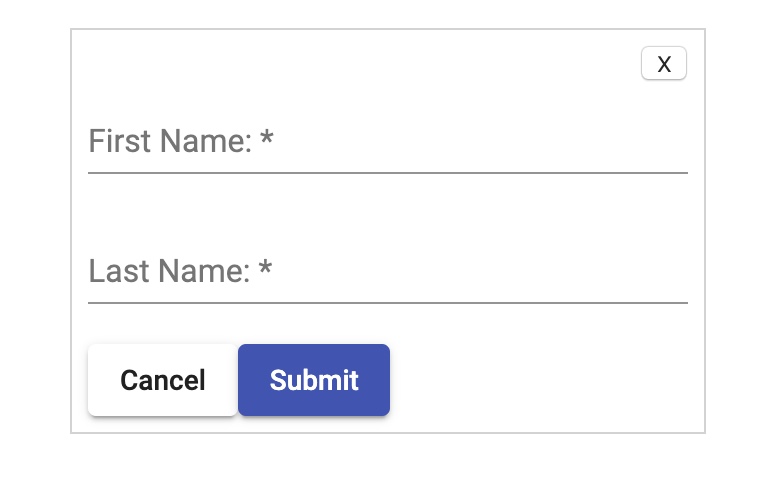
First lets see what happens when we click the Cancel button that has the simple generic analytics call on it.
We see the value of the enum picked up by the effect:

Next we see that the event fell through the first two checks because it is simple and only contains an eid:
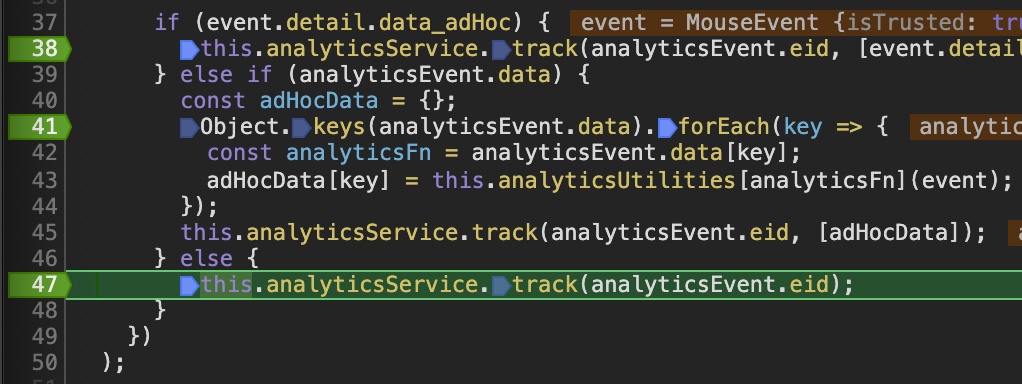
Looking at the console we see the result logged inside AnalyticsService:

Next lets take a look at what happens when we close the form.
Value of enum:

Resulting Object from analyticsValidPayloads.get(analyticsEnum):

Since the Object has data on it, it lands in the else if block where each of the keys of analyticsEvent.data are processed. This Object only has one key to process, 'formPristine'.
Result logged inside AnalyticsService:

Result logged inside AnalyticsService after entering values into form:

Last we look what happens when we submit the form with values.
Here is the form with three characters in the First Name field and six characters in the Last Name field:
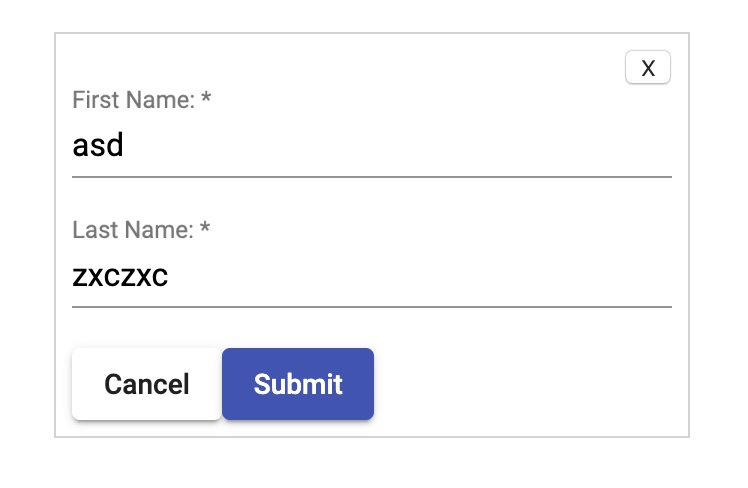
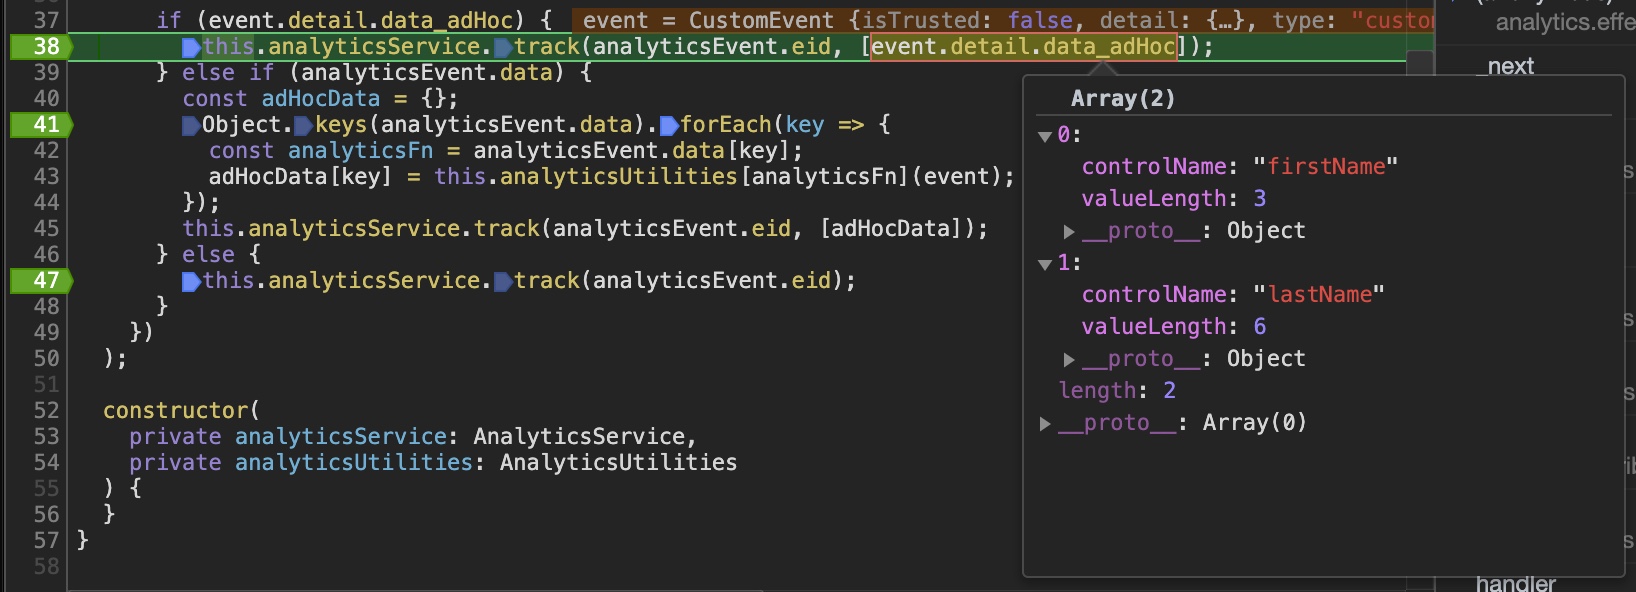
When the event is checked inside our effect, the first if is satisfied because the event has data_adHoc which was set inside the AppComponent upon form submission. You can see the data contains the control names and the length of the values within those controls:
Result logged inside AnalyticsService:

Summary
As demonstrated in this article, NgRx Effects can be utilized to perform a frequent task such as analytics calls. Structuring you api call, enums, and data may be unique to each individual project but the basic concepts are transferable.
I hope you enjoyed this article and found it helpful. Leave a comment below and let me know what you think!